quarta-feira, 26 de novembro de 2025

Windows 11 Start Menu not working - FIXED

Hey everyone! I wanted to share a solution I discovered regarding a frustrating issue with Windows 11 where the Start Menu fails to function when starting the system. If you've encountered this, you're not alone. It's a common issue that can be resolved with a few steps.


The Start Menu's functionality is deeply tied to the Windows Search service. Essentially, the Start Menu relies on this service to fetch and display content. If, for any reason, the Windows Search service is not running, you won’t be able to access the Start Menu effectively.

Here’s a step-by-step guide on how to troubleshoot this issue:


1. Check the Windows Search Service: 

   - Press `Windows + R` to open the Run dialog.

   - Type `services.msc` and hit Enter to open the Services window.

   - Look for the "Windows Search" service. Check its status. If it’s not running, try to start it manually by right-clicking and selecting “Start”.


2. Error: 

  In my situation, I encountered an error message stating: “Windows could not start the Windows Search service on Local Computer. Error 1722: The RPC server is unavailable.” At face value, this might lead you to believe there's an issue with the RPC service.


3. Hidden Dependency:

After researching this error, I learned that the problem wasn’t with the RPC service itself. It was running fine. Instead, I discovered that the Windows Search service has an indirect dependency on the Windows Event Log service. If the Event Log service is stopped, the Windows Search service cannot start. 


4. Resolving the Issue: 

To fix the problem, open the Services window and locate the "Windows Event Log" service. Make sure this service is running as well. If it is stopped, right-click it and choose “Start”.

 Once the Windows Event Log service is running, try starting the Windows Search service again. 


5. Restoring  the Start Menu: 

 After performing these two steps, I found that the Start Menu was operational again immediately. It’s a quick fix that saved me a lot of frustration!


This little issue can really throw a wrench in your day, but by understanding the relationships between services in Windows, you can troubleshoot more effectively and get things back to normal. If anyone else has faced this or has additional tips, feel free to share!


sexta-feira, 24 de janeiro de 2025

New tool pack released: OpenAI API Key Validator | AWS Key Validator | TruffleHog Searcher | ghorgs (GitHub Organization Fetcher)

Hello, carbon-based lives!

Today, I'm releasing a set of small tools that might help you during your Red Team/Pentest journey! 🏴‍☠️

openai-kv (OpenAI API Key Validator) - This Go program validates OpenAI API keys individually or in bulk using a multithreaded approach.
https://github.com/crashbrz/openai-kv


aws-kv (AWS Key Validator) is a Go program that validates AWS credentials. It supports validating single credentials or bulk credentials using a multithreaded approach. Also, dumps some of the credentials details.
https://github.com/crashbrz/aws-kv


TruffleHog Searcher: Command-line tool for searching through JSON files generated by the TruffleHog tool.
https://github.com/crashbrz/trufflehog-searcher


ghorgs (GitHub Organization Fetcher) This script dumps and displays information about all GitHub organizations using the GitHub API.)
https://github.com/crashbrz/ghorgs


I hope something can be useful!
hashtagLetsHack

quinta-feira, 21 de novembro de 2024

Vertical Privilege Escalation: Exploiting nmtui Sudo Misconfiguration

Privilege escalation vulnerabilities are still a major target for attackers looking to breach sensitive systems. Let’s take a look at a specific vertical privilege escalation example, where misconfigured sudo permissions let a low-privileged user run the nmtui tool without needing a password. By using the JSON import feature in Add Team, we can exploit this to escalate our privileges and get ourselves a root shell. 


So,
there’s a bit of a security issue with how sudo was set up in this case. It lets users with low privileges run nmtui (the Network Manager Text User Interface) as if they were root. Here’s the deal: by playing around with the JSON import feature in the Add Team section of nmtui, it kicks off a vi editor session with root privileges. If someone manages to escape from vi into a shell, they can elevate their permissions all the way to root.


Happy hacking #1337


Step-by-Step Exploitation Guide

Follow these steps to reproduce the vulnerability:

  1. Use a terminal session where the current user has limited privileges.
  2. Execute nmtui with sudo.
  3. sudo nmtui
  4. Edit a connection.


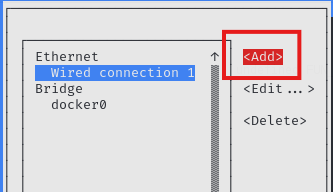
  5. Select "Add".
  6. Navigate to the Add option in the nmtui menu.
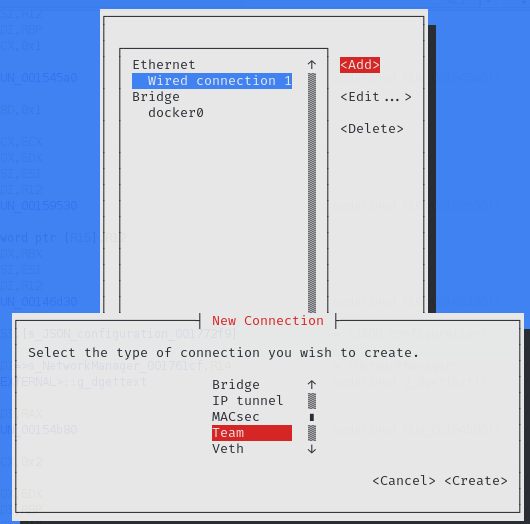
  7. Add a Team.
  8. Proceed by selecting the Add Team option.


  9. Choose the JSON option.


  10. In this step, nmtui attempts to import a JSON configuration, opening the vi editor in a root context.
  11. Escape from vi to a shell.
  12. Use the following command within vi to spawn a root shell:
  13. :!/bin/bash
  14. You are root!

*This behavior is further exploitable if nmtui is configured with the setuid (SUID) bit, allowing any user to execute it with elevated privileges.

Reverse Engineering Insights

The attack was uncovered during a reverse engineering analysis of nmtui using Ghidra, a popular software reverse engineering tool developed by the NSA. The analysis revealed that the JSON import functionality in nmtui invokes the vi editor, creating a security loophole in this case. 


As I did not have much time to explore it further, other nmtui features might call the vi.


References

Tools and Techniques:

  • Ghidra: Reverse engineering tool used to analyze nmtui.
  • Sudo: A powerful tool to allow users to execute commands with elevated privileges.
  • SUID: A Unix/Linux file permission that allows users to execute a file with the permissions of the file owner.

Related Escalation Techniques:


quarta-feira, 12 de maio de 2021

The curious case of XSS and the mouse middle button.

Hi guys! Today I will share my experience of how I exploited an XSS in a pretty particular scenario. 

During analysis, there was a feature on the application that allows the customer to add external reference links for specific options.

So, there were input filters not allowing double quotes, <,>, and other chars. The injection would happen only in the href parameter.


Basically: 

<a href="<xss_here>" target="_blank">ClickMe</a>


At this point, I thought, piece of cake, I will inject a standard payload like javascript:alert(1), and that's it, exploited! 

<a href="javascript:alert(1)" target="_blank">ClickMe</a> Right?


WRONG! 


As you know, the "target" parameter controls the window link behavior. 

In this case, it forces the link to open in a new tab due to the _blank value. When you left-click (the usual behavior), on the link, even with the javascript:alert(1) payload, the browsers handle it differently:


Firefox: Opens a new blank tab with the payload on the URL address bar


Chrome and Edge: Open a new blank tab with about:blank#blocked on the URL address bar. 


So, based on this behavior, it's clear it cannot be exploited just by left-clicking on the link.


I tried to change the target parameter value using javascript, but the instruction to open a new tab executes first, so there is no way to rewrite the value on the fly. 


After some research, I found these links https://bugzilla.mozilla.org/show_bug.cgi?id=55696 and https://support.mozilla.org/en-US/questions/1289787 related to new tab/window and javascript execution. Then the idea to use the mouse middle button popped up, and BANG!  


By default, the browsers(Firefox, Chrome, and Edge) have the middle button configured to force open links in a new tab. So, by using this button, the browsers executed the Javascript! Also, this time, the behavior was slightly different, and it can interfere during the exploitation. To test these conditions, I changed the payload to javascript:alert(document.cookie) 


Firefox: The browser executed the javascript in a new blank tab. However, the javascript could not read the cookie, as expected, due to run in a blank tab out of the application context.


Chrome and Edge: The browsers weirdly did not open a new tab, even forced by the middle button. So, the javascript is executed in the application context. That is, it can read the application cookies.


That's all, folks! Cya!

terça-feira, 23 de março de 2021

Burp Suite - Adding Internal Path Disclosure Capabilities

Hi guys, I hope everyone is healthy.

If you work with Burp suite, maybe you noticed Burp cannot identify Internal PATH Disclosure vulnerabilities by default.

I know most of the time, this vulnerability is ranked as Informational or Low. But I decided to write this after using the information acquired due to the internal path leakage to perform a more complex chain attack.

For this reason, the vulnerability was ranked as high due to the overall impact. In other words, I would not be able to create an effective attack chain without this leaked path.

The implementation is quite simple:

Install the extension Burp Bounty (Unfortunately, it is available for Buro Pro only).
On the tab Profiles -> Passive Response Profiles -> Add
Fulfill the fields(Response) and click on Add
Here you add the regex you are looking for. It's possible to add more than one regex. In my case, I created two different profiles, one for Windows issues and another one for Linux. 

Following the regex for both cases: 

Linux:  (?<!\S)(?:/[^/\s>]+)+
Thanks to codeworm for the help with Linux regex.

Windows: ([a-zA-Z]):\\?(\\[a-zA-Z0-9._-].*\s.*+)+\\
For Windows, the regex needs some enhancements.  

The new issues:


Now, some extra configuration is required to Burp shows it properly on the Target tab.
Click on the Issue tab and fulfill the fields. The Severy and Confidence must be selected. You are free to select the rating you want. The issue detail is the information that will be displayed on the Target tab.


After you added all the information, click OK and double-check if everything is saved. Sometimes the extension does not save the regex, them you must add it again.

Testing your new issues:

Navigate to: https://owasp.org/www-community/attacks/Full_Path_Disclosure and run a passive scan on this page.

Your Burp should show something like that:


Note: The Severity and Confidence are different on purpose, just to show it is possible to assess it differently.


Checking the match on the source code:

Linux: 


Windows:


This it, guys! 
Since I update the windows regex, I will update the post.